This article explains how to save DataSet in a file.
Level: Beginner, Requirements: C# Basics
Before I tell you how to save a dataset in a file, I like to explain what is a DataSet and how it is created in Visual Studio 2017 Community Edition. If you want to skip to saving DataSet to an XML file then CLICK HERE.
What is a DataSet in .NET Framework?
Generally speaking, a DataSet is a collection of data. In .NET a DataSet organizes data in form of DataTables. These DataTables contains rows and columns which provides a defined order for storing the data. For more details on DataSet, read this article: https://docs.microsoft.com/en-us/dotnet/framework/data/adonet/dataset-datatable-dataview/
How to create and add DataSet to your project in Visual Studio 2017 Community Edition?[ps2id id=’createdataset’ target=”/]
To create DataSet in Visual Studio 2017 Community Edition follow these steps:
- Right-click your project name (not solution name) in Solution Explorer.
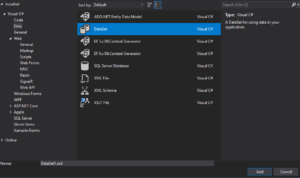
- Select Add > New Item… Following window will popup:

- From the left panel in this Window, select Data and then from the middle panel select DataSet.
- In the text box at the bottom of this Window type a name for your DataSet and click Add.
Now, your DataSet is created. It’s time to add some DataTables to it. - Double click your DataSet in solution explorer. You will see DataSet Designer opened in front of you.
- Now right click somewhere in the designer and click Add > DataTable
- Click table title which is default DataTable1. And give this table a name.
- Now press CTRL+L while the DataTable is selected.
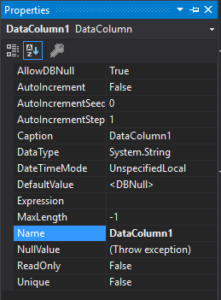
- This will add a column. Right-click the column and select Properties.
This will open properties for that column as shown below:

- Now using this you can change the data type, name, and various other column properties. Add more columns to your DataTable using steps from 8 to 9. And add more DataTable to this DataSet using steps 6 to 7.
- Now it’s time to add some data to this DataSet. You can do this in many ways. Such as binding your DataSet to a database or adding rows using business logic code (C# in this case).
- For this article, I will only cover adding rows using C# code. Following is how you can do it:
[csharp]
DataSet1 dt = new DataSet1(); //Create an object for your DataSet. ‘DataSet1’ is the name of the DataSet.
dt.Tables["Table Name Here"].Rows.Add("value for column 1 ", "value for column 2",…and so on);  //Adding rows to the DataTable.
[/csharp]
Save DataSet into an XML file [ps2id id=’savedataset’ target=”/]
There are many ways to save DataSet in a file. For example, the first thing that comes to the mind of a beginner in this is to traverse each and every row of each and every DataTable of the DataSet and save the data one-by-one in a file. But that will decrease the performance especially when you have large data in the DataSet.
So, instead of traversing each and every row, we can use a method: DataSet.WriteXml
This method will write the DataSet’s data and the schema in a XML file. Following code sample shows how to use this method:
[csharp]
DataSet1.WriteXml("FileName.XML");
[/csharp]
where FileName.XML is the file where you want to store your DataSet and DataSet1 is the object of the DataSet that we created earlier.
Now to read this file, we have another method: DataSet.ReadXml
This method reads the XML file containing the DataSet XML and parses it to the DataSet. Following code sample shows how to use this method:
[csharp]
DataSet1.ReadXml("FileName.XML");
[/csharp]
where FileName.XML is the file where you saved your DataSet data and DataSet1 is the object of the DataSet that we created earlier.
Conclusion
Saving the DataSet to an XML file and retreiving it back in the DataSet object can be done using just one line of code instead of traversing the DataSet using loops or any other method. But the main object of this article was not just to teach you how to save DataSet but also tell you the basics of how a DataSet works?
If you still have some queries or facing any issue, leave a comment and I will help you implement this in your application.
See you in next post.
Code Awesomely.. bye. ?
